.png)
Start your Plants on the Right Root and Get the Most from your Gardening Efforts
1. Check your soil before you plant. Plants need rich, loose soil to grow lush and full. If you have heavy clay soil, add up to a 2" thick layer of Premier sphagnum peat moss, Country Pride manure, or Nature's Yield Compost on the soil. Mix it into the soil to a depth of 6" to loosen the clay. These same organics will also keep sandy soils from drying so quickly.
2. Add some fertilizer to the soil and rake it in. Use Ferti-lome Bedding Plant Food in your flower beds and Ferti-lome Gardener's Special in your garden.
3. Harden your plants off before planting them unprotected into the ground especially during hot, sunny weather. Set the pots in a partially shaded area for a few days. Expose them gradually to the sun, dry air, and cool night temperatures. Protect them from the midday sun in particular. Water the plants in the pots when you first set them outdoors and at least once in the morning daily until you plant them in the ground. An alternate way is to plant them out right away and cover them with a Floating Row Cover for a few days. Stake the cover to the ground so it doesn't blow away. Water the plants right through the cover. Row covers also offer protection from one of our surprise late frosts.
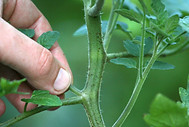
4. Pinch the top (up to 1/2) off most annual flowering plants that are growing as a single leggy stem to encourage side branching and reduce the water need of the plant until the roots get established. You'll give up some flowers in the first couple of weeks, but you will get many more over the course of the summer.
5. Pop-out the plant by pushing on the bottom of the container. Carefully slide the plant out and pinch in the sides of soil ball at the bottom and gently loosen some of the lower roots. This will encourage the roots to move out into the surrounding soil.
6. Plant at the right depth. Position the plant in the planting hole so that the top of the soil ball is at the same level as the ground around it. Fill in the hole and gently firm soil around the roots. Only a few types of plants should ever be planted deeper than this.
7. Water thoroughly immediately after planting.
8. Use Fertilome root stimulator solution around your newly planted flowers and vegetable starts to reduce transplant shock and encourage fast rooting.
9. Check plants daily for water. Remember that even though the surrounding soil may be wet, the soil in the original root ball can dry out faster and the roots may not have any water available to them. If the soil at the root ball is wet and the plant is still wilting, (Did you skip step 3?), you may need to spray the plant using a fine mister nozzle to reduce water loss from the leaves. You can also provide shade during the hottest part of the day or use Floating Row Covers.
10. Reduce watering frequency as roots grow out into the surrounding soil. Increase the amount of water applied at each watering.
11. Pinch off old blossoms to encourage new flowers to form. This is called deadheading. Pinching back leggy growth will encourage more branching.
12. Mulch plants as summer heat approaches to keep soil temperatures cool and to save valuable water.
13. Fertilize flowers with Jack's Classic Blossom Booster fertilizer regularly throughout the season for the finest quality plants that will keep on blooming.
14. Call us if your plants don't look right. We can help you solve the problem before it gets any worse.
15. Enjoy your beautiful flowers and bountiful harvest.